Friday, March 29, 2013

Easter Pop-up Cards


Bluebird Easter Card Front
 A recent Stampin' Up card club order contained the new Karen Burniston's Pop 'n Cuts base die for Sizzix's Stampin' Up exclusive release.  I just had to cut a few cards and make some fun pop-up cards for my kids and their families.  This die is going to be so versatile!

The card itself uses the same K & Company paper from a big pad--I just love all the subtle patterns and colors in this collection! The birdhouse is cut from heavy 110# cardstock with a Cricut (same cartridge was used on the birdhouses in the previous blog), and then it is embossed with a wood grain embossing folder from Sizzix for Tim Holtz, the raised areas are rubbed with Worn Lipstick Distress Ink.  The bird and branch is stamped and punched with Stampin' Up's coordinating stamp and punch.  The bluebird quote is from Artistic Outpost and is stamped on a Stampin' Up Apothecary label.

The great thing about this card base is that it has a nice decorative edge that tucks into slots that are cut into the corners of the back of the card.  Makes a neat package!  I cut another card for the inside pop-up mechanism.  I used the Pop 'n Cuts Magnetic Label die insert from Karen Burniston.  Yes, all the inserts for her Pop 'n Cuts are interchangeable!  Imagine the possibilities!

Bluebird Easter Card Inside
The inside of the card has the normal pop up mechanism, but I also added a trimmed mechanism from the Zig Zag pop up die.  To the zig zag pop up mechanism, I glued two eggs cut with Sizzix's Framelets nesting egg dies.  So when the card is opened, there is action that opens the pop up label as well as bringing the eggs up from behind into the action!  I added several other eggs to the card, some decorated with Washi tape and the rest cut from the printed paper pad.  The sentiment tag is from Stampin' Up. 

Easter Egg Card Front
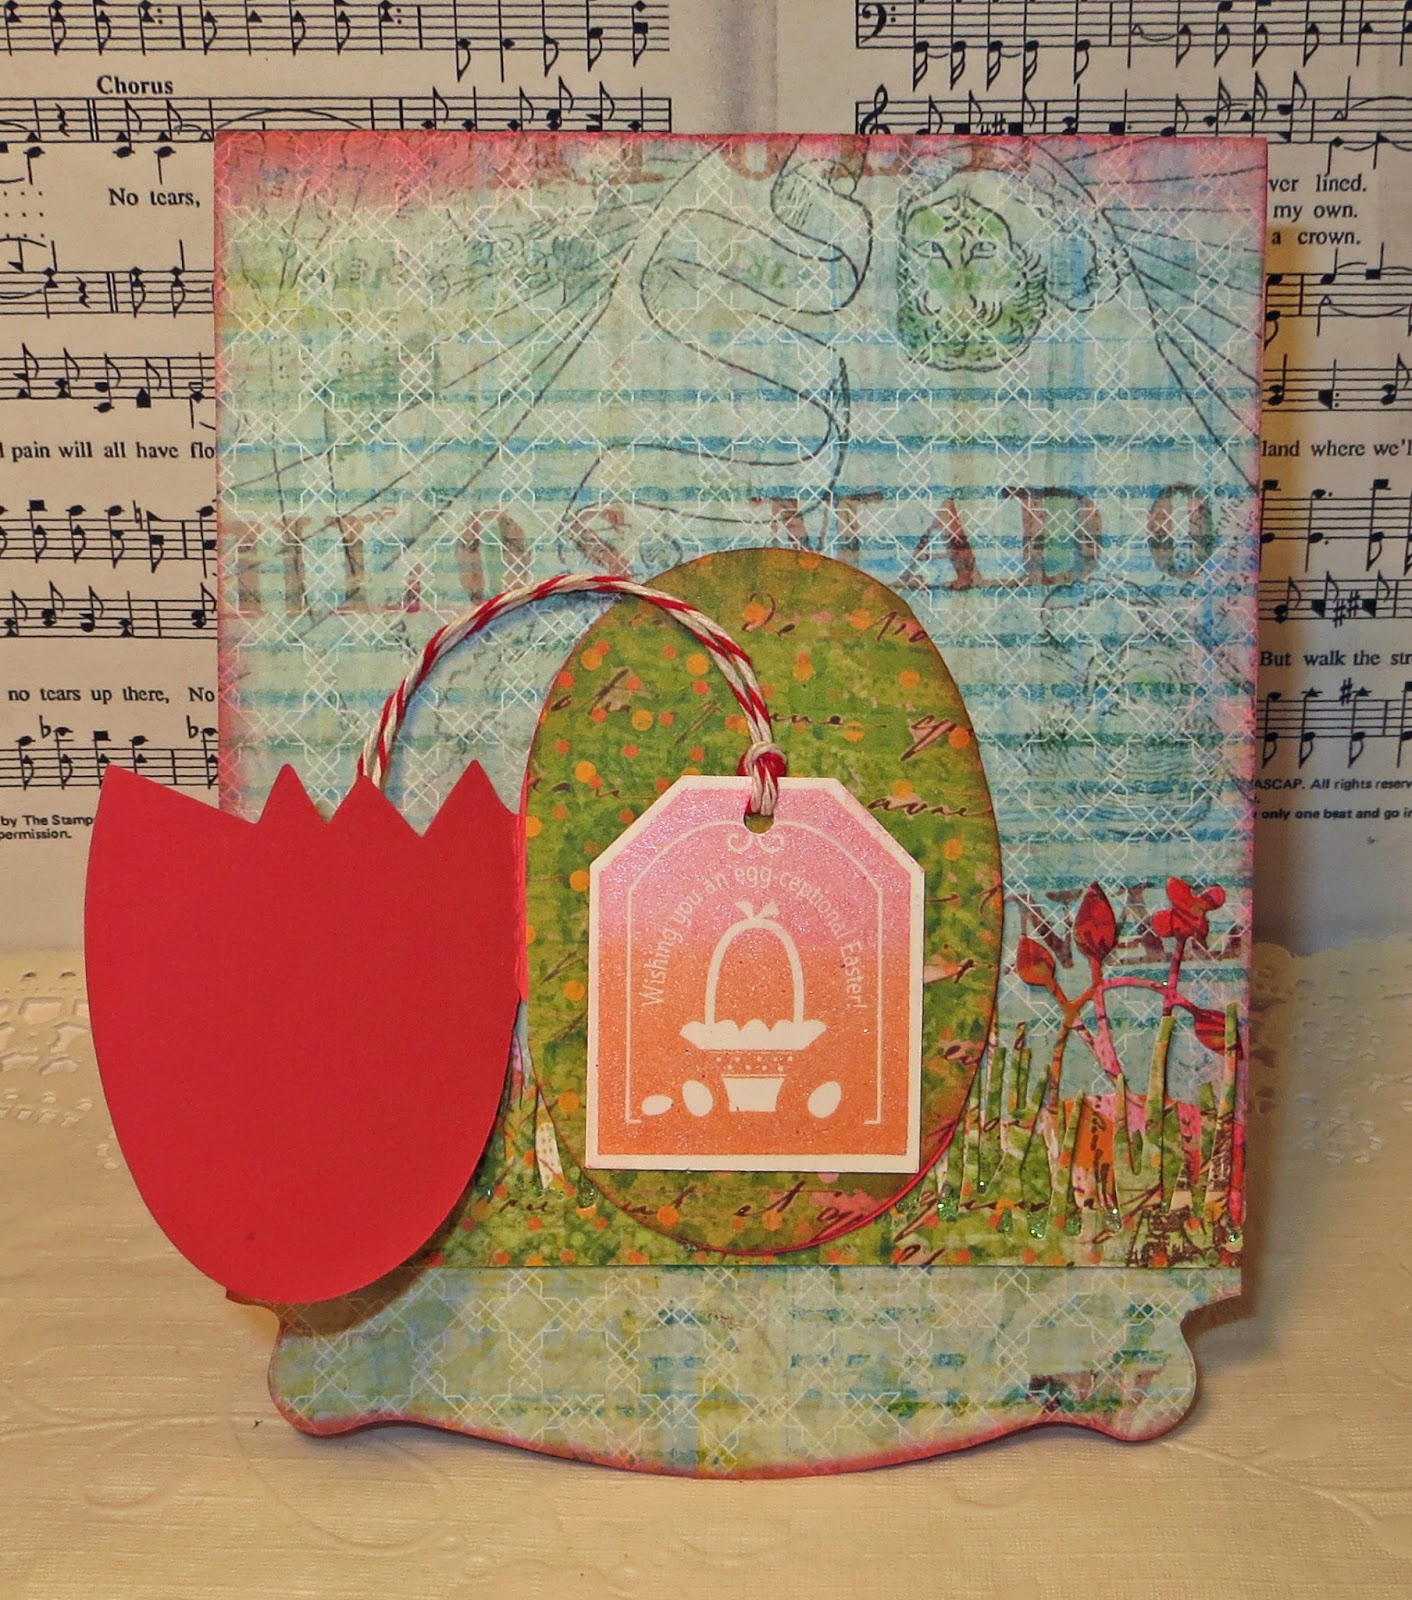
Front with egg open


The next card uses basically the same technique, except to the inside on the label pop up, I added a basket cut with an original Sizzix die and filled with little colored eggs.  The front of the card has a die cut with a cracked egg original Sizzix die.  It forms a little card that opens to reveal the sentiment from Stampin' UP.  The flowers and grass behind the egg are by Memory Box.

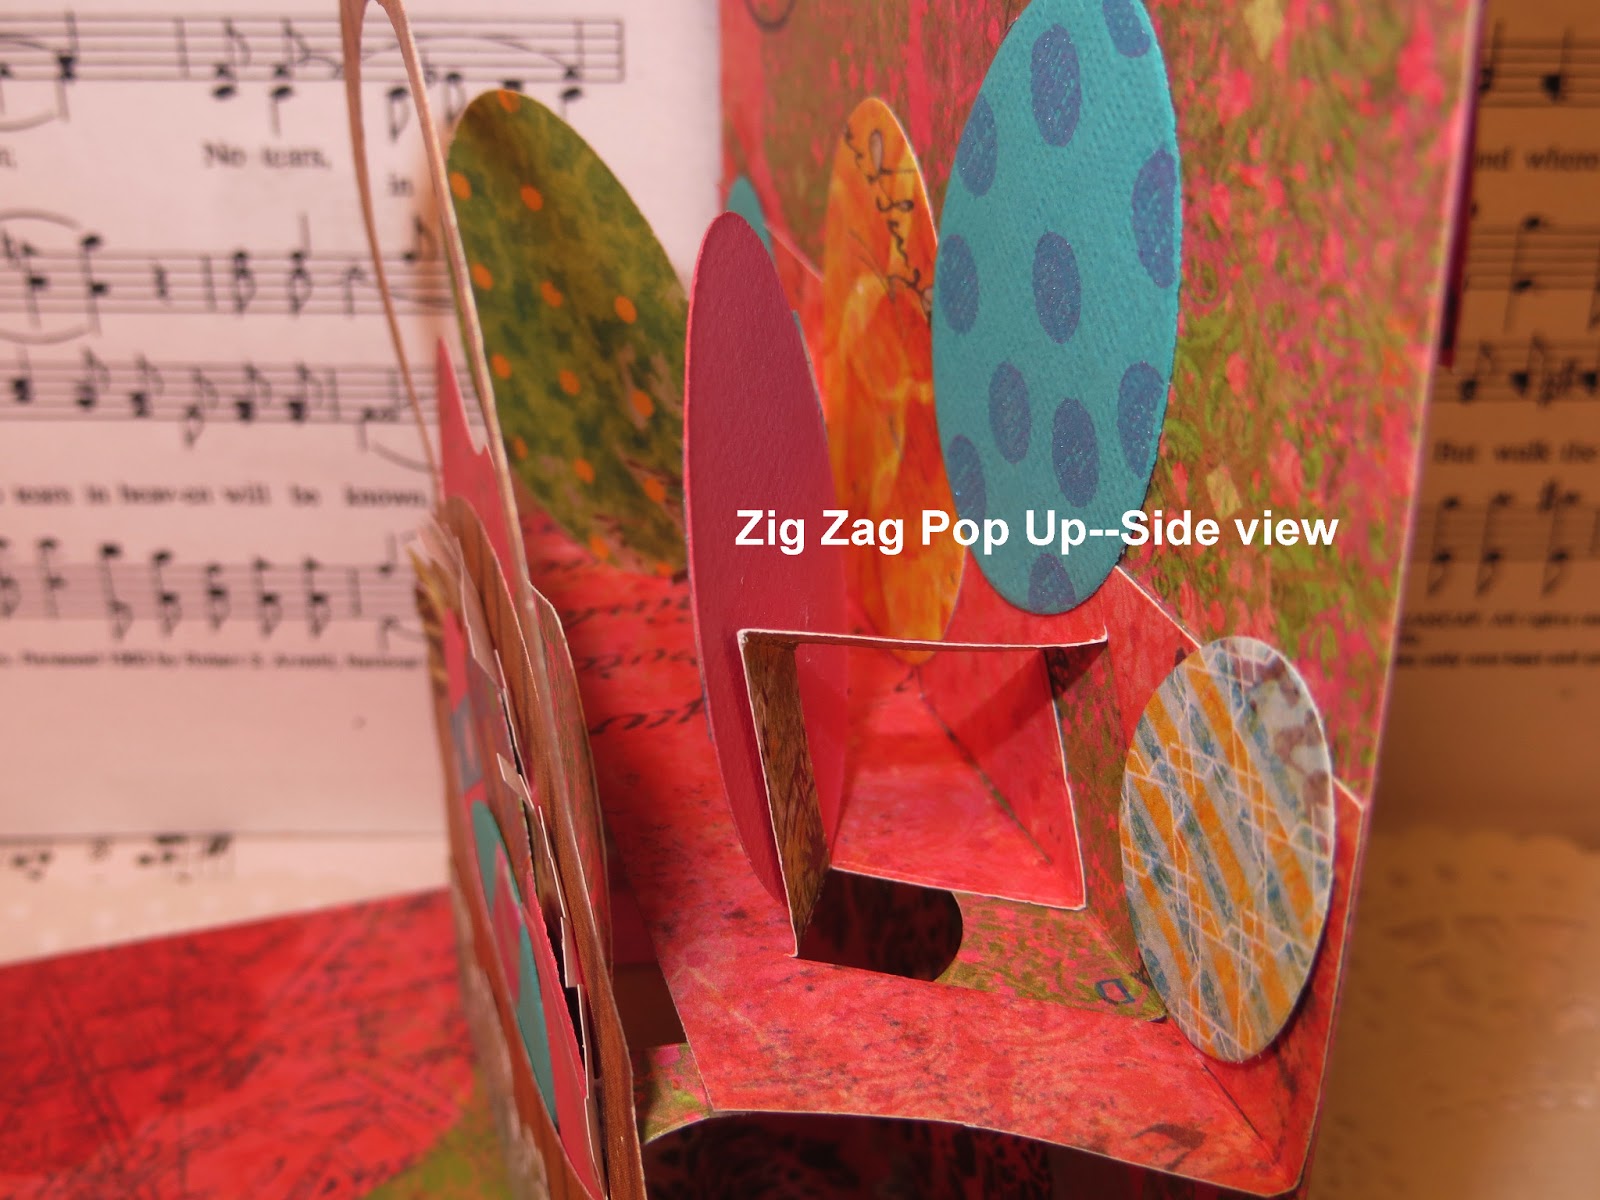
Trimmed Zig Zag Mechanism


After trimming the Zig Zag pop up mechanism so that it fits neatly on the platform behind the label, fold it forward, folding the little platforms along the score lines, open it back up and pop out the little platforms as shown.  This is where you attach the die cut you want to pop up from behind the label.


 Here are a couple of close up photos of the inside of the card with the Easter basket on the pop up label.  Note the location of the platform and the Zig Zag insert mechanism installed on top of the original platform.


Saturday, March 23, 2013

For the Birds!

Tip-In Pages for an Altered Book


It's the end of the month again, and time to show another set of tip-in pages done for the Tip-In Swap for Altered Books in the Tennessee Stampers' Yahoo Group.  This friend's book is all about barns, outhouses, birdhouses, and nature.  The birdhouse theme spoke to me, since the birds are actively building nests in birdhouses around my house.  We even have a wren's nest built underneath a decorative birdhouse on a tall, skinny metal pedestal sitting in the middle of a big square pot of English ivy beside our back door.  She sits in her partially enclosed nest even when we are coming and going.  Amazing!  I thought we would probably scare her off the nest for good, but she is persistent.  So I am refraining from watering the plant right now.  It is still dormant anyway.

I used some K & Company two-sided paper from a large pad for the background and birds.  The background is over-stamped with shades of Ranger Archival greens--Olive, Sap, Emerald, and Library.  I wanted the background to look like it was inside a deep copse of trees, so I used a subtle stamp from Stampin' Up, used for the second step in one of the two-step stampin' floral sets.  Then a leaf stamp shaped like a branch of oak leaves was stamped over all in places that makes it look like branches in the trees.  The birds were cut with Sizzix's Sizzlets Decorative Strip Die, Birds on a WireRanger Distress ink in Peacock Feathers and Worn Lipstick give more dimension and color to the birds.  Black Soot accents the wire.

The birdhouses are cut with a Cricut and are from the cartridge Stretch Your Imagination.  I used 110 pound white cardstock and covered it with Tim Holtz's Tissue Wrap that had been wadded up to wrinkle it before gluing it to the cardstock.  Distress Inks applied with the foam ink applicators in Worn Lipstick, Peacock Feathers, and Shabby Shutters gives the houses some fun Spring color!  The houses are perched on tree trunks cut from a Tall Birch die made by Memory Box.

The sentiment is from Artistic Outpost, stamped with Ranger Archival Ink in Manganese Blue, and it is cut with a die from the Apothecary Labels set by Stampin' Up.  Worn Lipstick Distress ink is used to shade the die cut while it is still in the die.  A feather is used to accent the layout.

This swap is one of the best swaps for Altered Books.  The book is protected from damage since it never leaves the house, and the cost to mail the pages is only a fraction of the amount that would be charged to mail a book.  I love the fact that I have control where the pages are going in my book, and that I can install them my way--with little or no warping, since I am cranky about how I glue pages into an altered book.  

I don't like the warping, ripples and buckling that comes from using adhesive that is too wet.  I realize sometimes it is unavoidable, but I try my best prevent it by clamping the book on the edges with waxed paper protecting other pages from accidentally being glued at the same time.  My favorite glue for gluing pages together to make a sturdy foundation for a layout in an altered book is still Uhu Glue Stick.  It is wet enough to grab and hold if the application is heavy and covers all areas.  I always use a brayer to smooth it before gluing the next page.  Immediately after gluing, I clamp the book closed with a series of large black binder clips and let the pages dry overnight.  

If the book is full of embellishments and cannot be clamped, I will isolate only the section I am gluing and weight it down.  You can get really creative here.  I have employed my Vagabond on top of the platform that comes with the machine as a quick weight.  It works pretty well.  At the same time, I have propped the portion of the book I am NOT weighing down against the desk, which is higher than the chest supporting the Vagabond, so the book won't break at the spine. 

If an opportunity arises for you to join a tip-in swap, give it a go!  It is the best way to do an altered book swap, in my opinion!

Friday, March 15, 2013

Review--We R Memory Keepers Envelope Punch Board

This is one of the most anticipated tools that ever came along, and I was so excited when my local Archiver's advertised that they had gotten them in stock.  I called as soon as the store opened and had them hold one for me.  Yes, I was on a waiting list somewhere else, so I also had to cancel that order.  I opted not to wait!  And I thought, after using it, my readers deserved another review, as if you haven't already read them all!

Also, since I am left-handed, I wanted to speak to the 15% of you who share that characteristic!  Yes, you can turn the board upside down and use it--most lefties are able to read upside down, so that isn't a problem.  BUT--since 50% of us lefties work our mouse right handed (including me), I discovered I can work a bone folder right handed as well!  (Some people say this will help strengthen the brain to challenge it this way!)

All of the other reviews stress accuracy in scoring and in choosing the first measurement.  That is correct.  Be dead-on with your measurement, punch that corner, and then score along the raised scoring edge.  Turn counterclockwise and line up the marker on the punch directly in the middle of that score line.  

GREAT TIP:   Some people say it is hard to see the score line!  True, if you are using printed paper for your envelope, but I overcame that problem by just turning the paper over so the white side is exposed! 

The score line is very visible this way.  Make sure the little marker (seen on the punch at the bottom left--looks like the tail of a comma, kind of) is completely centered on your first score line.  Punch and score again.  Turn counterclockwise, line up the marker in the center of the last score line and repeat until all four lines are scored.  Then remove and round the corners at the back of the punch with the built in corner rounder--also operated with the same turquoise punch.  Fold and crease with your bone folder, add adhesive and your envelope is finished!  I do like to either fold an glue down the inside corner that is from the bottom flap where it sticks above the side flaps.  You could also trim it off, which would be easier.  Line up the side flaps (which will be on an angle) and mark the place the bottom flap crosses those lines and trim before gluing.  This is optional, of course, and isn't necessary, unless you just want that particular look to your envelope!

I was a little hesitant to buy this tool, in case it didn't have the latest measurements printed on it (the first shipment had 8 errors in measurements), so I asked if mine had the latest update on it.  Archiver's provided me with the correct measurements printed out on cardstock, in case it was that first version.  When I got home, I checked them, and the ones on my board were correct.  But it is handy to keep the extra printed chart near my paper cutter.  I understand that all the boards coming out now will be correct.

As I figured, I love this new tool!  The measurement for the A-2 card envelope is a little larger in the height than we are used to using, but I didn't buy this for the standard card, since I buy those envelopes by the hundred.  But the card fits inside just fine, and that is better than it being too small!  This is for that occasional card that needs to be bigger (or smaller).  Sometimes I feel limited by the 4 1/4" x 5 1/2" constraints, don't you?  Not anymore!  Thank you, We R Memory Keepers!