Thursday, August 24, 2023

My Sweet Petunia's new tool!


 I opened up the new Precision Glue Press tool from My Sweet Petunia today.  Wow...I cannot say enough about this well thought out design!  

If you suffer from hand fatigue from squeezing a glue bottle for hours, this tool is for you!

If you have arthritis in your hands, this tool is for you!

If you constantly find your glue applicator tip is clogged, this tool is for you! 

If you struggle to get just the right amount of glue onto tiny diecut fonts and other thin or very small items, this tool is for you!

If you are tired of stopping your project to go wash the excess glue off your fingers while trying to just put a tiny bead of glue onto one of those tiny diecuts, this tool is for you!

If you have stopped using Ranger's Glossy Accents (and other favorite plastic squeeze bottle products) because you cannot squeeze it hard enough anymore, this tool is for you! 

If you are tired of recapping your favorite glue bottle every time you take a break from your project, this tool is for you!

I only used it for a few hours this afternoon, and my project was finished in record time, thanks to this tool.  My gluing was done with precision (yes, I know that is part of its name), and the glue was always at the tip, ready to squeeze nearly effortlessly...and it never dried up at the tip!

I am now going to try and find extra bottles and tips for other viscous products I have just let sit and collect dust because of the difficulty of squeezing those little bottles.  Thank you, Iliana, for your time, thought, and effort into giving us something that will be as helpful as your first MISTI I am still using!

Tuesday, December 8, 2015

A Karen Burniston Gift Card Pop Its Die!

When Elizabeth Craft Designs came out with Karen Burniston's new die for gift cards, I just knew I would have to teach it at the Tennessee Stamper's Retreat this fall.  And without much ado, here it is!

Santa Says Shop Inside

Santa Says Shop Front
1.      Die cut all elements and stamp all to prepare for assembly.
2.      Fold inside working mechanism by working the folds to pop out the main and side platforms.
3.      Insert the gift card or another card the same size and slide it in between the 2 little slots above platform, down into the slot so you can see area to tape when applying backing card.
4.      Using ScorTape (or similar), tape edges of card on the back, avoiding areas that must move. Turn it over and do the same on the other side of the card on its back.
5.      Remove release paper from tape on one side of the card, line up the backing card, tuck into fold and work exposed tape area onto backing card.  Then turn card over, remove release tape from remaining side, and close the remaining side of the backing card and press well.
6.      Fold the line of the little pole platform (straight red piece) and add tape to the foot, run pole through slot platform, remove the release paper foot down with the edge fitting right up against the back of the card.
7.      Using ScorTape, cover each leg front on all main platforms with tape.  Leave tape covered. Do not put tape on the smaller side platform on the right.
8.      Add some washi tape and bows to little presents and stick one to the front of the pole platform.  Add second present in front of first present with a pop dot to give it more 3D qualities.
9.      Assemble the sleigh and add round “Santa Says Shop” to the back part of the sleigh as seen in photo.
10.  Remove tape from two center posts on big platform and align the sleigh supports onto the posts.
11.  Glue alpine tree above the little side platform.  Add the deer by gluing one of its legs to side platform.
12.  Add ribbon to plain white tag and glue the scalloped oval sentiment in the center of the red ornament.  Tie silver cord around neck of ornament and mount on tag.  Adhere tag on bottom of card.
13.  Glue two small snowflakes on gifts and end of sleigh, and add one large snowflake at bottom left of blue area below tag.
14.  FOR FRONT OF CARD:  Glue Top Note Die cut in center of card.  Add “Believe” on top of die cut and decorate with remaining larger snowflake. Your card is finished.  It will fit into an envelope that a 4 x 6 photo can be mailed in.  I found this size at Staples.  Insert the gift card and watch your recipient be delighted at the way in which you have presented their gift this year!


Sunday, October 18, 2015

Crazy Birds....My Newest Obsession!


Tim Holtz's Bird Crazy dies are all the rage now.  I loved them from the first time I saw them.  So I conjured up a big batch of them for birthday cards, congratulations cards, and just for fun cards.  Then I was excited that the dies for the accessories were being shipped.  Well, I accidentally re-ordered the dies for the birds, and when they came, I was so disappointed.  So I grabbed some of the props from my Elizabeth Craft Designs' Critters designed by Karen Burniston, and dressed up these two Crazy Birds with the snorkeling gear.  With a little trimming and adjustments, they worked fine!  I used clear packaging to cut the mask's clear area, and in person, it looks really cool.

I love how the wings can be cut separately. I used this plus to make the little short bird look like he is holding all the gear underneath his wing.  


I am off to make some more fun cards with these fun little stamps and matching dies now that the accessories dies are in my possession!  Watch this blog for more in the future.


Friday, December 12, 2014

Christmas & Winter Cards with Elizabeth Craft Designs!


Winter Mantelscape Project


If any of you have been following the Elizabeth Craft Designs blog, you know I have been blogging over there as a guest!  I have neglected my own blog...but now I am back here offering some BLOG CANDY from Elizabeth Craft Designs!  It is my most favorite die set of all, the Fancy Label Accordion Card die set.  I have been making what I call "mantelscapes" out of them.  The most challenging to date was the Twelve Days of Christmas.  You can see it HERE.  And be sure to leave a comment on THIS blog for a chance to win the random drawing that will take place on Wednesday, December 17, just in time for Christmas.  Some lucky person will win this for their stocking this year!

Now on to the featured mantelscape for this winter.  This one can go into January with its snowy scenes.  I attended a special retreat to teach this technique in October, and the ladies all loved creating this project.  We used Karen Burniston's triple pivot technique in the center of this winter mantelscape.  You can go to YouTube and watch her amazing video on how to do this technique HERE.  Be sure to scroll down below the simple instructions on this card to see my Christmas version of the card Karen did in this video.  It is fun to see how it looks in other papers and colors!

To do this project, you will need some coordinating winter/snow cardstock, watercolor paper, Distress inks, and several stamps with winter scenes on them.  I used some that were much too large for the panels, but each one had an area that could be cut down and used.  


  1. Stamp four winter images on watercolor paper (I like Fabriano Hot Press 140 lb.) and die cut with the largest Fancy Frame.   It is the one slightly smaller than the pivoting area inside the frame.  
  2. Stamp two more with winter sayings or a title.  
  3. Color all images monochromatically with Ranger Distress inks and the Distress ink application tool in shades of the lighter blues from Tim Holtz's Distress ink collection.  Ink the edges of these stamped images and adhere to the center panel of the accordion card.  
  4. Stamp something for the front of the card when it is closed and adhere to the center of the panel.  
  5. Now following Karen's instructions for making the triple pivot card that goes in the center of this mantelscape, make a coordinating piece for your own card.  
  6. Cover all frames with the coordinating snowflake frame sold separately.  Cut a frame for each panel from the same die. Trim it down as shown in the Twelve Days of Christmas tutorial and adhere to the back of each panel to firm up the piece.


First few panels Close up

        Evergreen Triple  Pivot card

7.  Accent frame edges using snowflake frames that coordinate with the Fancy Label die set.  Decorate the little trees with Elizabeth Craft Designs Glitter Dots or rhinestones or sequins.   Take great care when handling this delicately cut grouping of trees.  They tend to come unglued to their neighbors and/or they can break easily at their pivot points.  I have gotten in the habit of  reinforcing the frames from behind, extending the pivot point areas into a basic reinforcement to help keep the pivots strong and in good working order. 


Last panels (far right)

So try this fun technique during some of the days around Christmas and beyond to help cheer your household up from the let-down of the holidays!  This is a fun project, and it will give your family something to do--watch you create!  Or enlist them in the project for a fun family time.  Make several and display them all together on the mantel, or on a table in a prominent place.
Finished!

Here is a photo of the original Evergreen Triple Pivot Accordion Card constructed after watching Karen's video:


Christmas--Evergreen Triple Pivot Accordion Fold Card on display

Front of closed card


...and now for your comment for a chance to win this Fancy Label Accordion Die set from Elizabeth Craft Designs!


Thanks for coming today!  Good luck on the drawing!


Thursday, October 9, 2014

More Fall Cards with Distress!


Use both Positive and Negative Space from Die Cutting!

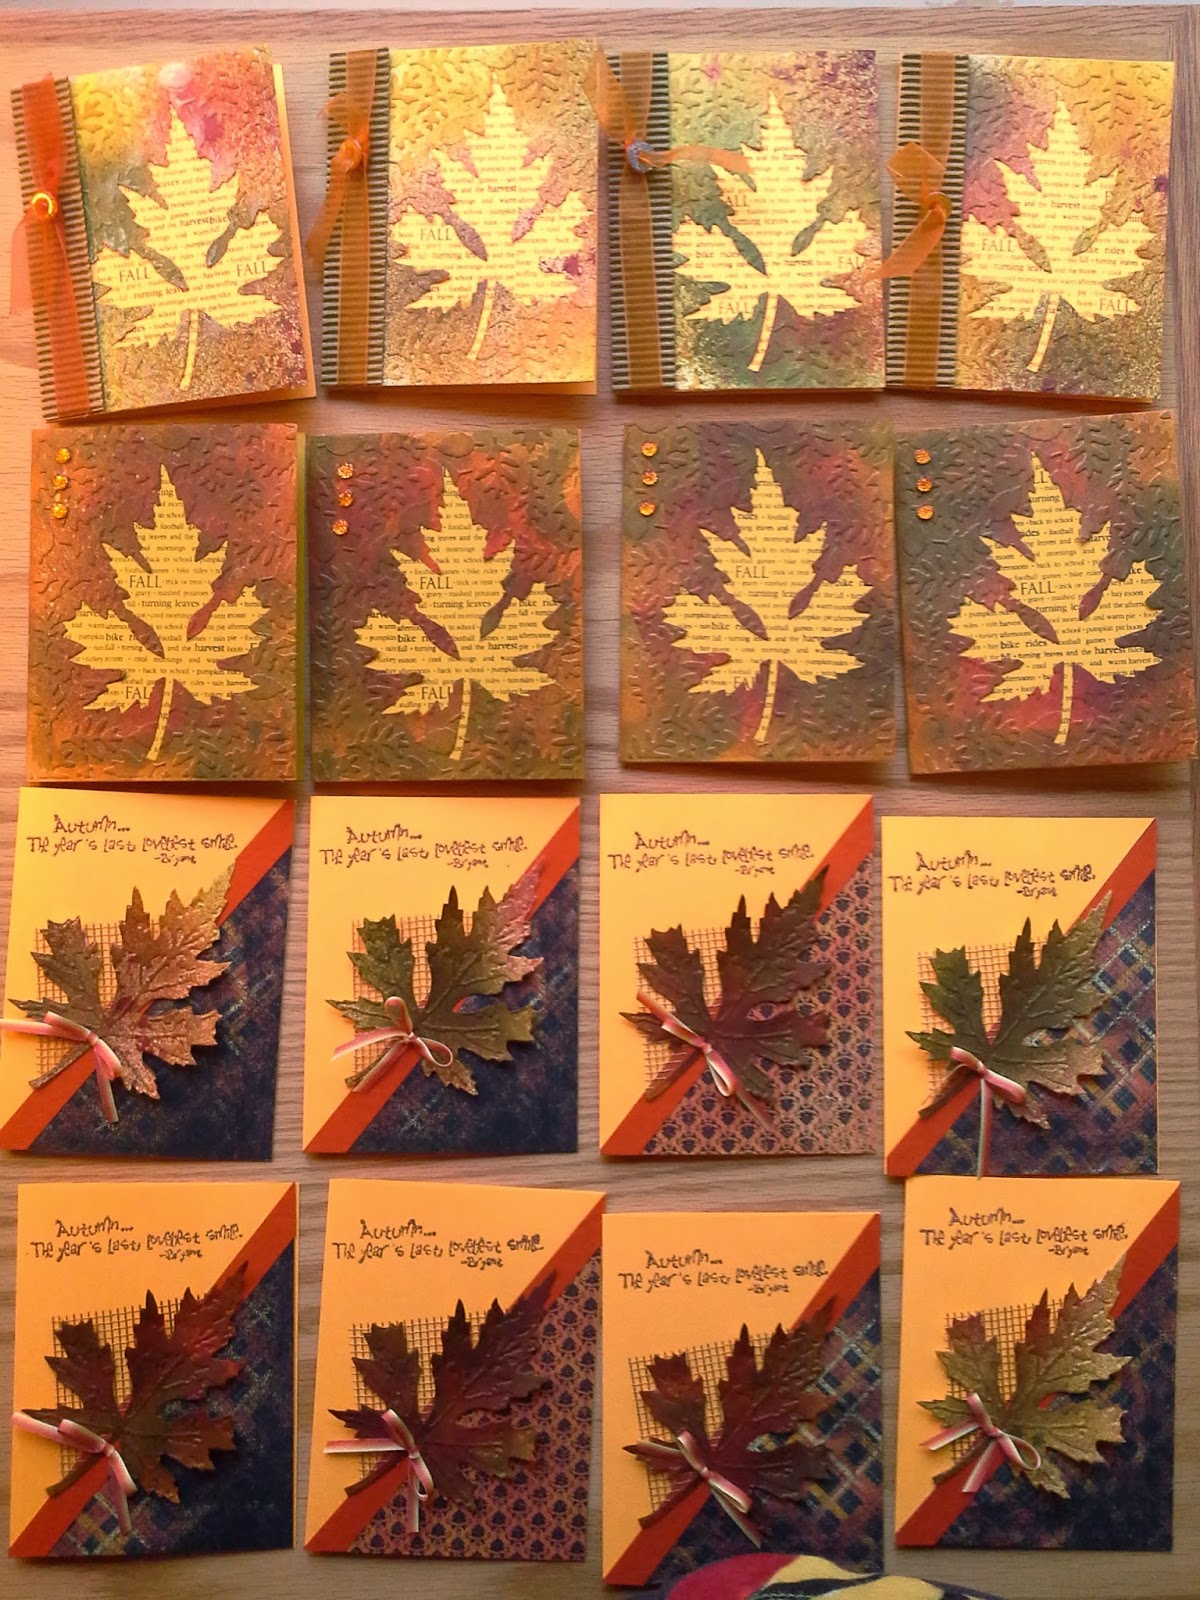
Last weekend Tim Holtz's BigZ Leaf Die and Texture Fades Embossing Folder arrived in my mailbox, just in time for the fall cards I like to send to my family and friends.  When Simon Says Stamp's Wednesday blog challenger arrived in my mailbox, just in time for the fall cards I like to send to my family and friends.  When Simon Says Stamp's Wednesday blog challenge was to use watercolor this week, including Distress, I jumped at the chance.  So I sat down to make a few cards.  Well, a few more than a few!  When I got started, I couldn't seem to quit until 1 AM.  Of all the leaf dies, this one has become my favorite one.  It is so fun to see what my scribbles on the paper reveal when the leaf is die cut.  Each one, like in nature, is different.

I quartered two pieces of cardstock, one sort of orangey-gold, the other ivory, and then proceeded to color them randomly with Distress stains.  The darker cardstock I used the Distress daubers and applied random squiggles and dots with Festive Berries, Crushed Olive, Spiced Marmalade, and Wild Honey.  The ivory cardstock received only a spritz of Distress stains mixed with water, using the following colors:  Fired Brick, Forest Moss, and Mustard Seed.  While I was spritzing, I also spritzed a little on the first batch.  I wasn't impressed with the first batch until I die cut the leaves.  Wow.  What an amazing thing!  These leaves resemble turning leaves more than any I have ever made!  And the negative space that is left demanded to be used on a card as well!  The second batch was just about perfect to me!

So I took another Tim Holtz Texture Fades with small leaves on it and ran that negative space through my Vagabond.  After all the embossing was finished,  I applied Brushed Corduroy Distress Ink with the Inkssentials Blending Tool on the raised areas.  Next step, I spritzed the leaves and the negative spaces with gold spray mist to give them all a warm shimmer.  

I have an old Hero Arts stamp with fall-related words on it, so using a stamp positioner, I was able to stamp those words repeatedly on the backing card, revealing them through the hole left behind from die cutting the leaf.  I love this!  Above you can see one of each card I made with these magnificent leaves and their negative spaces.  Other items used on these cards are some corrugated cardstock rubbed with Distress ink to blend with the card, patterned paper cut on the diagonal, cardstock, ribbon, magic mesh, and orange goosebumps.

The photo below shows the results from one long evening spent in my studio!  The first row shows the negative space from the leaves that were just spritzed onto cream cardstock.  The second row was the orangey-gold cardstock with the Distress Stain Daubers and Distress spritzing.  The third and fourth rows show the various leaves obtained with both methods.