Sunday, March 18, 2012

The Challenges Continue!

My Vagabond in the studio
 Before I begin my post on the challenges, I have to point out that I am entering the "Where in the World is Your Vagabond?" photo submission, and I needed to put this photo on my blog!  So excuse me while I enter this promotion for the Vagabond.  I have had every Sizzix from the original one to the Sidekick to the BigKick, but this one takes the cake!  I love it, and its motor sure does save my cranking hand!


And now to the challenges...

Four Cards Inspired by Bed Bath & Beyond Flyer
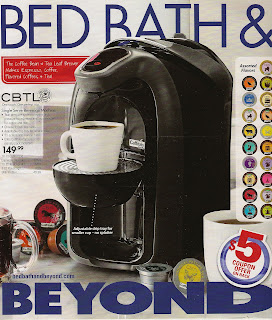
The Tennessee Stampers Yahoo group  has been encouraged to participate in a weekly challenge.  The past two weekends' projects are a bit related, in that we produced two projects from the first challenge.  Last weekend our challenge was to find inspiration in the Bed Bath & Beyond flyer.  It was difficult to choose just one page, because there was so much inspiration in that flyer!  It is still sitting on my desk for more inspired projects.  I may never look at another ad without thinking that it could inspire a card or a scrapbook page.  Try it sometime when you are trying to find your muse!  

Inspiration Page
The front cover inspired me to create four cards.  As seen in the Inspiration Page photo on the right, the ad was for a coffee maker, and the menu showing available individual coffees were all lined up to the right of it.  The circular design of all the coffees lined up made me think of the Stampin' Up! "Circle Circus" set.

Close up of one of the Inspiration Cards


THE FIRST PROJECT--Bed Bath & Beyond Inspiration Challenge

Another Card


 Using different colors, similar to the ones in the ad, I stamped all the different designs from the stamp set and a button stamp from another set, punched them out with a 7/8 inch circle cutter, backed them with dark brown punched circles (1 1/4 inch),  and arranged in two rows down the side of the card on patterned background paper.  A ribbon backed the sentiment on the left side of the card.  The sentiment from a birthday stamp with a scalloped border was punched out of its border with a circle punch, backed by a brown punched scalloped circle, and mounted on the ribbon with pop dots.  


 THE SECOND PROJECT--Leftover Challenge

This weekend the challenge was to use some "leftovers" from a recent project and create something, using the leftovers.  We have called it the "Leftover Challenge."  I chose to use the stamped borders from the sentiment I had punched out last weekend.  It made a kind of stylized sunflower when a brown punched center from leftover brown scraps filled the opening left from last week's punched out sentiment.  On top of that, three leftover punched designs from "Circle Circus" became the center of the flower.  These were placed atop stems that were stamped onto a turquoise background from leftover scraps.  The grass at the bottom is made by using the Memory Box Fringe die, and it was die cut from green card stock that was in that scrap pile on my desk. The little sentiment is stamped on leftover scraps, punched with a small oval punch and tied with some brown and white butcher's twine. 

Leftover Challenge Card


Sunday, March 4, 2012

A Challenge and the Green Tag Swap!

THREE GREEN TAGS
The challenge on the Tennessee Stampers' Yahoo Group was to jump start our muse by getting into the studio and creating something this weekend.  A card, an ATC, a tag, or anything that shows we are making art will do.  Knowing a green tag swap is soon due, I had a double goal this weekend.  The RangerInkLink Yahoo group is having a Green Tag Swap.  The theme for this swap is green, and we are to make three tags, using green Ranger products and recycle/reuse items.

I chose to use a sewing theme.  With Tim's applicator tool I began sponging some lighter green Distress inks, Shabby Shutters and a little Bundled Sage, to a #8 manilla tag, giving the tag some background color.  Next the lace from one of Tim's mask sets was aligned with the left side of the tag, and a darker green  from the Distress palette (Peeled Paint) was sponged over the mask and around the edges of the tag.  The mask was removed and a small amount of Pine Needles Distress ink darkened and enriched the color on the edges of the tag.  Next, Tim Holtz's dress pattern stamp by Stampers Anonymous was stamped over the entire tag in black.  

Tag Details
For several years now, I have saved interesting shopping tags, ribbons, and little envelopes that contained extra buttons from purchased garments.  I chose a piece of ribbon from my stash, attached it to the bottom area of the tag, and picked out a little button envelope for each tag, satisfying the recycle/reuse requirement for the project.  A little Distress inks in colors used on the tag were sponged onto the envelope, helped to unify it with the tag.  The butchers' twine attaching the envelope to the tag was stained with Distress stain to match, as was the satin ribbon adorning the reinforcement hole of the tag.

The piece of dress form attached on the right side of the tag was made by tinting Ranger's Sticky Back Canvas with Shabby Shutters Distress Stain.  To give it more depth, Pine Needles Distress Stain was dabbed from the applicator onto a non-stick craft sheet, picked up with the the Shabby Shutters Stain dabber and applied randomly over the canvas.  Next it was sprayed with Sour Apple Perfect Pearls Mist, and while it was still damp, Perfect Pearls Green Patina was brushed on with a soft fat brush, giving the canvas some spots of green shimmer.  After it was dried with a heat tool, the backing was removed from the adhesive side and applied to Tim Holtz's Grungepaper, burnishing it well with a bone folder.  The canvas-covered grungepaper was then die cut using the dress form area from Tim Holtz Alterations Sewing Room die, with the canvas side towards the cutting surface of the die.   The dress form was then adhered to the side of the tag, and the excess was trimmed along the tag's edge.

Pale green buttons were tinted using alcohol inks to match the tag and were attached to the tag with glue dots.  The larger button was tied with a piece of black hemp twine.  To finish the tag, the little button envelope was affixed to the left edge of the tag with glue dots, and two small green buttons inside the envelope finished the project.  

And this weekend, I met the Tennessee Stampers' Yahoo group challenge and finished a swap on the RangerInkLink yahoo group at the same time!  I rather like the green tag--it gets me in the mood for St. Patrick's Day, shopping for a new outfit (in green, perhaps?), and SPRING!